I am super excited to share with you today a project I have been dying to try ever since I saw a demo video by the uber talented Tim Holtz. I will post the link to his video along with a list of products I used at the bottom of this page.
I really like this NEW "Fallen Leaves" stamp set by CTMH. The outlines are perfect for this technique. Follow the link to purchase one for yourself.
I stamped the leave images onto craft cardstock then stamped over a few with embossing ink and applied the Sticky embossing powder ( like liquid glue when heated )
then I applied the foil sheets in three different metallic colors. These foil colors are really pretty, the photo does not do them justice.
I fussy cut a few extra leaves after they were dry and adhered them to my card with 3D foam squares to add some dimension.
This is my finished card. I added a cream color photo mat to the Kraft cardstock. I really love this technique and plan on foiling more in the future.
Thanks for stopping by today. Be sure to view Tim's video to see his handy work. Happy Scrappin' Carrie
Products used for this project:
CTMH stamp set: Fallen Leaves
Distress Embossing ink
Distress Inks in Vintage Photo, Rusty Hinge and Wild Honey
Ranger Sticky Embossing Powder
Ranger’s Transfer Foil Sheets : Vintage foils
Tim Holtz Ranger Demo - Sticky Embossing Powder with Foils - CHA 2015
HoneyBeeStamps sneak peak card
Hello, sneak peek from HoneyBeeStamps
I was given the privilege of playing around with a few of the NEW stamp sets that are coming out Oct. 2nd from HoneyBeeStamps.
This typewriter is by far the cutest little thing ever!
I am also in Love with the New ( available now ) Brush Grunge Alpha Stamp set. This set is so versatile. You can literally create any title you want for all your card making and scrapbooking needs.
I created a watercolor background and repeat stamped the cute typewriter
in a row. I popped up the middle one with some 3D foam squares for
dimension and interest. I love the shadow effect.
Be sure to join the Honey Bee Stamp Release Party on Facebook going on Now. Lots of giveaways, previews and fun. Remember Seven NEW stamp sets will be released and available for purchase Friday, Oct. 2nd.
Fun Fall Project Life Card
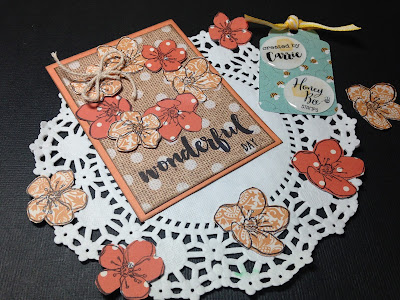
Of course I had to pull out my newest stamps from #HoneyBeeStamps
I used stamps from "Beautiful Life" and "Sweet as Honey" sets.
I love the sweet little outline flowers in the "Sweet as Honey" set. A fun way to use these stamps, is to stamp them onto a patterned paper, then to fussy cut the image out of the patterned paper creating your own embellishments.
Having two different sized flowers are perfect for creating a fall floral wreath or flower bouquet. I attached the smaller flowers with 3D foam squares to add dimension to my wreath.
To complete my card I stamped the sentiment from the "Beautiful Life" set, layered my card and tied a cute twine bow.
One of the best things about these new stamp sets is that all the tiny words are the same font. You can created a multitude of sentiments from one set.
Pop over to the HoneyBeeStamps shop and pick up a few of these beautiful stamps for yourself.
Happy Scrappin'
Carrie
Mixed Media Fall Project life cards
I love the look of Mixed media Art projects. I do not create a lot of MM on a regular basis due to the mess and time involved in creating such cards. I am really happy with the results of this project and I hope my fellow swappers like them just as much.
I used this beautiful fall paper by Bazzill Basics for this project. I really like this pad of 6x6 paper because it is double sided so you get lots of options.
To create the background on my cards I tore strip of paper from several different patterns, I inked all the edges in Ground Espresso Distress ink and using my Tombow liquid adhesive I glued the pieces, layered on top of each other onto a 4x6" sheet of Kraft cardstock.
Once all my edges were sealed to the cardstock I cut the 4x6 in half leaving me with 2 - 3x4 layered cards. I then edged the cards with Liquid Leaf paint in Renaissance Gold. I just wanted to add a touch of something special to my cards and this Liquid Leaf was just the ticket.
Next I created my cute little pumpkin.
To create the pumpkin, I punched three 1 1/2" circles in two different patterns and the stem from
corrugated paper. I inked all the edges then
layered them together.
To created the bird for my other card I used a CTMH stamp and stamped it onto Kraft cardstock then fussy cut around the image. I fussy cut the wing from a different patterned paper and attached it using a 3D foam square. This added some dimension to my bird. Here is a close up look at both finished cards. I added a burlap square behind the pumpkin and a brass paperclip with hanging tag to both cards.
Thanks for stopping by today. I hope this post inspires you to get a little messy and try something new.
Happy Fall Y'all
Carrie
Subscribe to:
Posts (Atom)


